ESP Web Tools
User friendly tools to manage ESP8266 and ESP32 devices in the browser:
- Install & update firmware
- Connect device to the Wi-Fi network
- Visit the device's hosted web interface
- Access logs and send terminal commands
- Add devices to Home Assistant
Try a live demo
This demo will install ESPHome. To get started, connect an ESP device to your computer and hit the button:
Products using ESP Web Tools


How it works
ESP Web Tools works by combining Web Serial, Improv Wi-Fi (optional), and a manifest which describes the firmware. ESP Web Tools detects the chipset of the connected ESP device and automatically selects the right firmware variant from the manifest.
Web Serial is available in Mozilla Firefox, Google Chrome and Microsoft Edge browsers. Android support should be possible but has not been implemented yet.
Configuring Wi-Fi
ESP Web Tools supports the Improv Wi-Fi serial standard. This is an open standard to allow configuring Wi-Fi via the serial port.
If the firmware supports Improv, a user will be asked to connect the device to the network after installing the firmware. Once connected, the device can send the user to a URL to finish configuration. For example, this can be a link to the device's IP address where it serves a local UI.
At any time in the future a user can use ESP Web Tools to find the device link or to reconfigure the Wi-Fi settings without doing a reinstall.
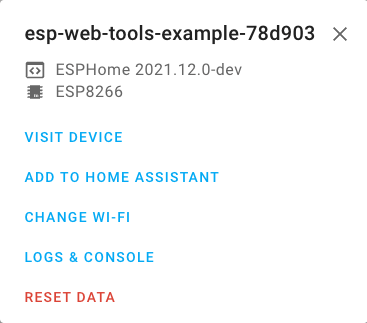 Screenshot showing the ESP Web Tools interface
Viewing logs & sending commands
ESP Web Tools allows users to open a serial console to see the logs and send commands.
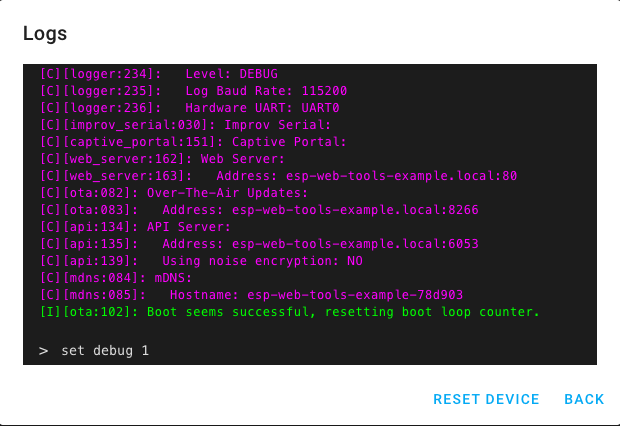 Screenshot showing the ESP Web Tools logs & console
Adding ESP Web Tools to your website
To add this to your own website, you need to include the ESP Web Tools JavaScript files on your website, create a manifest file and add the ESP Web Tools button HTML.
Click here to see a full example.
Step 1: Load ESP Web Tools JavaScript on your website by adding the following HTML snippet.
<script
  type="module"
  src="https://unpkg.com/esp-web-tools@10/dist/web/install-button.js?module"
></script>
(If you prefer to locally host the JavaScript, download it here)
Step 2: Find a place on your page where you want the button to
appear and include the following bit of HTML. Update the
manifest attribute to point at your manifest file.
<esp-web-install-button
  manifest="https://firmware.esphome.io/esp-web-tools/manifest.json"
></esp-web-install-button>
Note: ESP Web Tools requires that your website is served over
https:// to work. This is a Web Serial security
requirement.
If your manifest or the firmware files are hosted on another server,
make sure you configure
the CORS-headers
such that your website is allowed to fetch those files by adding the
header
Access-Control-Allow-Origin: https://domain-of-your-website.com.
ESP Web Tools can also be integrated in your projects by installing it via NPM.
Preparing your firmware
If you have ESP32 firmware and are using ESP-IDF framework v4 or later, you will need to create a merged version of your firmware before being able to use it with ESP Web Tools. If you use ESP8266 or ESP32 with ESP-IDF v3 or earlier, you can skip this section.
ESP32 firmware is split into 4 different files. When these files are
installed using the command-line tool esptool, it will
patch flash frequency, flash size and flash mode to match the target
device. ESP Web Tools is not able to do this on the fly, so you will
need to use esptool to create the single binary file and
use that with ESP Web Tools.
Create a single binary using esptool with the following
command:
esptool --chip esp32 merge_bin \
  -o merged-firmware.bin \
  --flash_mode dio \
  --flash_freq 40m \
  --flash_size 4MB \
  0x1000 bootloader.bin \
  0x8000 partitions.bin \
  0xe000 boot.bin \
  0x10000 your_app.bin
If your memory type is opi_opi or opi_qspi,
set your flash mode to be dout. Else, if your flash mode is
qio or qout, override your flash mode to be
dio.
Creating your manifest
Manifests describe the firmware that you want to offer the user to
install. It allows specifying different builds for the different types
of ESP devices. Current supported chip families are
ESP8266, ESP32, ESP32-C2,
ESP32-C3, ESP32-C5, ESP32-C6, ESP32-C61,
ESP32-H2, ESP32-P4, ESP32-S2 and ESP32-S3. The correct build will
be automatically selected based on the type of the connected ESP device.
{
  "name": "ESPHome",
  "version": "2021.11.0",
  "home_assistant_domain": "esphome",
  "funding_url": "https://esphome.io/guides/supporters.html",
  "new_install_prompt_erase": false,
  "builds": [
    {
      "chipFamily": "ESP32",
      "parts": [
        { "path": "merged-firmware.bin", "offset": 0 },
      ]
    },
    {
      "chipFamily": "ESP8266",
      "parts": [
        { "path": "esp8266.bin", "offset": 0 }
      ]
    }
  ]
}
Each build contains a list of parts to be installed to the ESP device. Each part consists of a path to the file and an offset on the flash where it should be installed. Part paths are resolved relative to the path of the manifest, but can also be URLs to other hosts.
If your firmware is supported by Home Assistant, you can add the
optional key home_assistant_domain. If present, ESP Web
Tools will link the user to add this device to Home Assistant.
By default a new installation will erase all data before installation.
If you want to leave this choice to the user, set the optional manifest
key
new_install_prompt_erase to true. ESP Web
Tools offers users a new installation if it is unable to detect the
current firmware of the device (via Improv Serial) or if the detected
firmware does not match the name specififed in the manifest.
When a firmware is first installed on a device, it might need to do some
time consuming tasks like initializing the file system. By default ESP
Web Tools will wait 10 seconds to receive an Improv Serial response to
indicate that the boot is completed. You can increase this timeout by
setting the optional manifest key
new_install_improv_wait_time to the number of seconds to
wait. Set to 0 to disable Improv Serial detection.
If your product accepts donations you can add
funding_url to your manifest. This allows you to link to
your page explaining the user how they can fund development. This link
is visible in the ESP Web Tools menu when connected to a device running
your firmware (as detected via Improv).
ESP Web Tools allows you to provide your own check if the device is
running the same firmware as specified in the manifest. This check can
be setting the overrides property on
<esp-web-install-button>. The value is an object
containing a
checkSameFirmware(manifest, improvInfo) function. The
manifest parameter is your manifest and
improvInfo is the information returned from Improv:
{ name, firmware, version, chipFamily }. This check is only
called if the device firmware was detected via Improv.
const button = document.querySelector('esp-web-install-button');
button.overrides = {
  checkSameFirmware(manifest, improvInfo) {
    const manifestFirmware = manifest.name.toLowerCase();
    const deviceFirmware = improvInfo.firmware.toLowerCase();
    return manifestFirmware.includes(deviceFirmware);
  }
};
Generating a manifest dynamically & version management
Alternatively to a static manifest JSON file, you can generate a Blob
URL of a JSON object using
URL.createObjectURL
to use as the manifest url. This can be useful in situations where you
have many firmware bin files, e.g. previous software versions, where you
don't want to have a different static manifest json file for each bin.
If you are hosting on github.io, this can be paired nicely with
github's REST API
to view all the bin files inside a folder.
const manifest = {
    "name": name,
    "version": version,
    "funding_url": funding_url,
    "new_install_prompt_erase": true,
    "builds": [
        {
            "chipFamily": "ESP32",
            "improv": false,
            "parts": [
                { "path": dependenciesDir+"bootloader.bin", "offset": 4096 },
                { "path": dependenciesDir+"partitions.bin", "offset": 32768 },
                { "path": dependenciesDir+"boot_app0.bin", "offset": 57344 },
                { "path": firmwareFile, "offset": 65536 }
            ]
        }
    ]
}

const json = JSON.stringify(manifest);
const blob = new Blob([json], {type: "application/json"});
document.querySelector("esp-web-install-button").manifest = URL.createObjectURL(blob);
Customizing the look and feel
You can change the colors of the default UI elements with CSS custom properties (variables), the following variables are available:
--esp-tools-button-color--esp-tools-button-text-color--esp-tools-button-border-radius
There are also some attributes that can be used for styling:
install-supported |
Added if installing firmware is supported |
install-unsupported
|
Added if installing firmware is not supported |
Replace the button and message with a custom one
You can replace both the activation button and the message that is shown
when the user uses an unsupported browser or non-secure context with
your own elements. This can be done using the activate,
unsupported and not-allowed slots:
<esp-web-install-button
  manifest="https://firmware.esphome.io/esp-web-tools/manifest.json"
>
  <button slot="activate">Custom install button</button>
  <span slot="unsupported">Ah snap, your browser doesn't work!</span>
  <span slot="not-allowed">Ah snap, you are not allowed to use this on HTTP!</span>
</esp-web-install-button>